
Access automation rules grant, approve, or deny access without someone handling each request. Use them for access that follows a pattern: a patching team that needs admin every second Saturday, finance staff who need extra access during month-end close, or low-risk requests that should never wait on a person.
Only tenant admins can create automation rules. App owners manage their access profiles, not these rules.
A worked example
The patching team needs admin access to a database on Saturdays from noon to 4 PM, and should lose it at 4 PM. One rule handles this:
- Trigger: Schedule, weekly on Saturday, 12:00 to 16:00 (use a cron expression for patterns like every second Saturday)
- Conditions: Team equals "Patching"
- Access: the database's "Admin" access profile
- Approval: No approval
- Revocation: Fixed duration, so access ends when the window closes
Nobody files a request, nobody approves it, and nobody has to remember to take the access away.
Create a rule
Go to Access Hub > Access Automation and click + Create Rule. The wizard has eight steps.
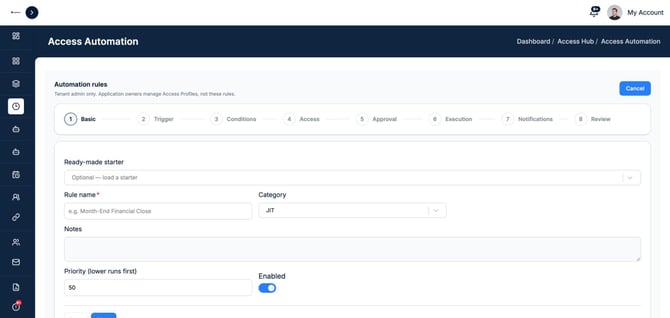
1. Basic. Start from a ready-made starter or a blank rule. Starters include Weekend Maintenance, Month-End Financial Close, Monthly Payroll, Database Patch, Go Live, Audit Support, Vendor Support, and Emergency Access, plus policy rules such as "Auto approve low-risk short access" and "Deny critical-risk access." Choose a starter and click Load starter. Then give the rule a Name, a Category, optional Notes, and a Priority. Lower numbers run first. Use Enabled to turn the rule on or off.
2. Trigger. What starts the rule:
- Access request created: runs when someone submits a request
- Manual: runs when an admin clicks Execute
- Schedule: runs on a frequency or cron expression, between a start and end date, during a daily time window, in a time zone you choose
- API: runs when called from another system
- Calendar
3. Conditions. When the rule should apply. Combine as many conditions as you need with AND or OR, and use NOT to reverse one. Fields include the person's department, job title, team, location, employment type, employee status, and group, as well as the requested application, profile, risk level, and duration.
4. Access. Pick the Application and the Access Profile to grant. Rules always grant through an access profile, never a raw group or role. Set the Grant type (Immediate, After approval, Scheduled, or Conditional) and the Duration.
5. Approval. No approval, Single level, Multi level, Parallel, or Conditional. Choose the approver type (Manager, App owner, Security, or Tenant admin), an approval time target, and whether comments are required.
6. Execution. Set retries, a maximum runtime, a concurrency limit, and what happens on failure (retry, roll back, or fail). For Revocation method, use Fixed duration to remove access at the end of the window, or Manual to remove it by hand.
7. Notifications. Send updates by email, Slack, or Microsoft Teams. Choose the events: rule started, rule completed, approval pending, approval rejected, grant successful, revocation successful, failure, and timeout.
8. Review. AppGovern shows the rule in plain language, for example "When an access request is created and employee status equals Active, then the request is auto-approved." Check it and save.
Check that a rule works
The Access Automation list shows each rule's trigger, conditions, action, priority, and state. Click Execute to run a rule by hand. Then open Access Hub > Execution History to see which runs matched and which were skipped.
Rules that fit most teams
- Auto-approve low-risk access for short periods
- Deny critical-risk access requests outright, so they go through a different process
- Require a tenant admin for any admin-level profile
- Scheduled windows for patching, payroll, and month-end close